OMG its been over a year and a half!!
Well its been over a year and a half but finally I am back doing my blog. Why so long away you ask??? Well over the course of 6 months I took all of the photos needed to update my blog and uploaded them to the computer and kept telling myself tomorrows the day. But tomorrow never came and then the worse thing happened I lost all the photographs when my computer corrupted. So without the photographs I faced a mammoth task of re taking all the pictures and an even bigger one of remembering all the products I had used to make the cards etc. So I decided I will start again from now with some new projects and remember to back up my pictures!!
So what have I been up to in the last 18 months??
Well my 2 rats Davina and Sandy sadly passed away and I rescued 2 gorgeous little degus who I named Ruby and Garnet

Well the lived happily for 14 months together but sadely Garnet was unwell and passed away too. But I still have Ruby and she loves nothing more than falling asleep in my pocket or jumping out of the cage in to my daughter Aisha's dressing gown hood when she opens the cage.
This is Ruby snuggled up warm in her fleecy tunnel
Something else I did last year for the 1st time ever was go on holiday with my daughter Aisha. She was almost 12 at the time but we had never been on a holiday.
We may not have flown off to sunny Spain or gone to Disneyland but we could not have had a better time.
A truly amazing present to us from an amazing person 3>
We went for a week to Weymouth and yes sometimes it was wet and windy but we had a fabulous time and it has given us some memories and photos to treasure for ever!!
The morning we set off for Weymouth, it was lovely and sunny and we were both just a little bit excited!!!
The breakfasts in the guest house were just scrummy, everything you could think of from yogurt and fruit, full fry up to pancakes and maple syrup and everything in between. After 3 courses at breakfast you could go until dinnertime without eating!! Although there was always room for ice cream!!!
Sunny day trip to Lyme Regis-the journey on the bus along the coast was beautiful too.
We took a trip on a pedal boat on one afternoon, it did seem quite scary at times when we looked back and realised how far out we had paddled. But then when you look down and realise how shallow the water really is at Weymouth even when you are far far out!!
A day trip to The Sealife Centre-pretty sure Aisha would happily have bought the entire shop if she could have afforded it!!
Going for a paddle on our last morning as we could not swim due to carrying all our luggage!!
After the excitement of our holiday you would think the rest of the year would be very quiet. But October and December would prove to be just as exciting especially for my daughter Aisha who could not possibly have dreamt what would happen to her!!
In October it was her birthday she went out with some friends, had a sleepover, got some amazing presents and I made her a cake.
I made her a very special cake in honour of our four favourite men!! The awesome JLS.
I also made matching cupcakes for her to take to school for her friends.
But her year was to get better as JLS were to have their final concert ever at the O2 on 22nd December and Aisha had no idea her Christmas present was tickets to the concert. To say she went crazy would be slightly understating it!!!
In our seats at the O2 waiting for the boys to come on stage-Aisha is still in shock!!
Well after all that fun and excitement the rest of the year was filled with making cards for friends and family as well as baby albums and scrapbooks being made to order.
Memory Album
This album was requested by a friend Hayley for her elderly nan to help her remember all the family members and for her to tell the other members of their family the stories behind the pictures while she still could!!
This was a first for me as I usually did anniversary albums or baby books. Also I was asked to put the pictures in it too. This was a challenge but a really nice one. Because I felt I was learning about the family too and creating a story.
I started out as I meant to go on by using paper flowers and ribbon on the front of the album!!
The haircuts and the outfits in these Christmas photos was just hilarious, especially the dungarees!!
I cut into the background papers then tucked the pictures under the flower blooms.
For the next few pages I used some Martha Stewart punches and lots of chipboard letters
Again here on the boat trip photos I played with cutting into the background paper and tucking the photos in. It worked really well making it look like they were tucked behind ribbon on a pin board.
Lots of girlie embellishments for those cute baby pictures of great granddaughter Ellie!!
I had the most fun with this last page layering up all the flowers and leaves around the whole page
When I had finished this album even though I was pleased with how it had turned I was still nervous that Hayley may not like it or even worse her nan would not.
I needn't have been because Hayley was over the moon and when she presented it to her Nan she cried (with happiness of course)
A few weeks later it was a friend of my daughters Birthday and Aisha asked if I could make her a present. Aisha told me Molly liked to collect little bits and bobs and really liked little boxes.
The Little chest of drawers
I used my much loved ultimate pro to create 4 little drawers which I decorated and lined with papers from craftwork cards. I attached them to a base and added a top both 1" larger than the drawers. I decorated the top with flowers I had made as well as butterflies, gems and ribbon. I finished it by adding Molly's name to the top
Making this little chest of drawers started me on a new found love of creating little gifts not just cards and scrapbooks.
Which brings me nicely to why I have decided to start my blog again!!
The lovely Leanne Chivers of Crafters Companion recently put out a call for design team members for the main Crafters Companion design team and the Die'sire design team. Well to say this would be a dream come true would be a very big understatement. So I decided I would give it a go, and not doing things by halves decided I would try my luck for both. I guess I hoped this would give me better odds.
But this has along the way given me its fare share of challenges as it meant creating 6 projects or cards all in one go, and giving detailed descriptions on how I created them and what I used in a very short space of time. (Good practice for that design post )
Well I thought to myself this is where that blog of yours will come in handy!!!
Well projects created I logged into my blog to upload everything before sending off my application to Leanne and that's where I have been ever since (writing and re writing, then editing and trying to upload photos whilst everyone in the neighbourhood has got home and eaten in to my broadband speed.
The design team challenge
I started out with a visit to Hobbycraft (always dangerous!!) where I purchased some paper mache boxes including a tissue box and also some notebooks and journals that were plain ready to decorate as my plan was to make at least 3 of my pieces altered art projects rather than just cards.
I then started on the mammoth (but never boring) task of rummaging through hundreds of papers, ribbons, flowers, buttons, dies and rubber stamps to name a few to gather together all my treasures that I would use.
The Tissue box
I started out with a plain paper mache tissue box which I had purchased from Hobbycrafts
Using Crawford and Black white acrylic paint I painted the entire box inside and out with a good covering then set aside to dry.
Whilst the box was drying I selected some pieces of paper from the Docrafts Forever Friends Kraft Notes 12" x 12" paper pad.
Then using the box as a template I cut the pieces to size and covered all sections of the box and lid with the exception of the inside!
Using the Creative Expressions 6 petal flower button/floral stamp and the paper flower dots stamp I created my own paper roses in shades of pink and blue by stamping onto Neenah cardstock and then inking all over.
I used Tim Holtz distress ink pads in Broken China and Fired Brick to colour the roses.
I also created more flowers by using my Spellbinders Rose Creations dies to cut flowers from Crafters Companion turquoise centura pearl.
Other dies used included butterflies and the Spellbinders Shapeabilities Foliage. These were cut from small scraps of green and pink card I had in my bit box.
The top of the box was further embellished with gem stones, Anna Marie designs pearl bead stems, Hat pins and vintage style lace.
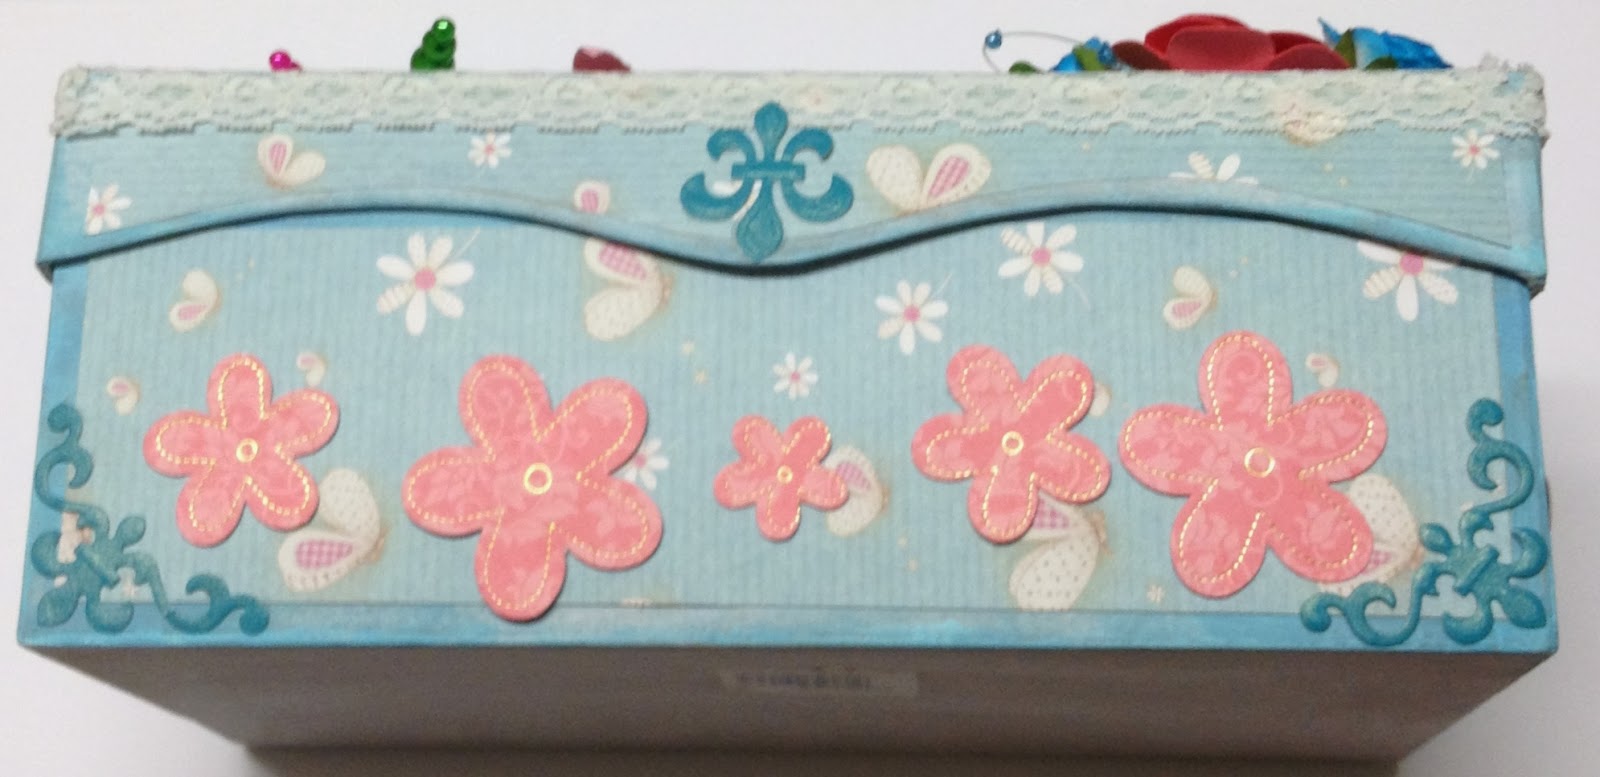
Then it was onto further embellishing the sides of the box which I had already covered in decorative papers. For this I used some already die cut pink flowers from a Kanban kit that was feeling unloved in my craft room. I then die cut in shades of turquoise lots of fleur de lis corners and embellishments from the Spellbinders Fleur de Lis motifs set. I also cut two large Chantilly Bows using my tattered lace die and found a get well soon message as a finishing touch.
The 2 tattered lace Chantilly bows were layered one on top of the other to create a very 3d bow
It now has pride of place in my living room because now I love it so much I can't see myself giving it away!! Oh well good excuse to have to make another one!!
Note Book
For this I started out with a 2 blank Chipboard note book covers and some fabrips (fabric you can tear into strips and use to bind books) and also a re fill notebook blank for the inside. These pieces all came from a Studio Calico kit purchased from Create and Craft.
After assembling the base covers with the blank notebook inner and binding with some fabrip I set about creating the design I would put on my notebook. From the very beginning I had in my head that I wanted it to be very pastel toned. So I chose lots of pinks and blues as well as some greens.
First of all I covered the front and back covers of the book with pieces of beige striped paper I had chosen from the Forever Friends Kraft Notes pad. I then took a second piece of paper in a pink and green check from the same pad and cut leaving a 1/4" border all around then layered onto the front of the book. I took a further strip of the same paper and matted onto the back cover so that it all matched perfectly.
Next using Spellbinders Nestabilities Label 1 and Grand Labels 1 sets of dies I cut 3 various sized pieces that nested onto each other. Firstly the largest from Crafters Companion centura pearl card, the next from Anna-Marie's dottie card in olive and lastly from a backing paper in the Kraft Notes set.
I cut various sizes and colours of flowers using the spellbinders Rose Creations die as well as butterflies and also Fleur de lis corners from the motifs collection by Spellbinders.
I finished off my design by further embellishing with 2 Spellbinders borders layered up cut from Crafters Companion centura pearl and Anna-Marie dottie card (olive), flat back pearls, pink and cream raffia and Cosmic Shimmer coloured PVA in Teal Sky and Vintage Pink.
I known that I will never write in it or give it away because I think its far to pretty!! Will just have to sit and look at it every now and again!!
Its a shame because the pictures really do not do the colours justice and really do not show the real dimension to this project
It seemed I had a new addiction!!
The altered art A4 notebook
For this project I used a Hobbycraft A4 plain ringbound chipboard notebook
I decided I was going to go with a tealy blue and chocolate brown colour scheme with some beiges thrown in for good measure!!
I used the following items to create my notebook
Dies
Spellbinders Rose Creations Dies, card creator Branching out, Fleur de lis motifs, die d-lites tweets, die d-lites corner sprigs and Nestabilities labels 20
Papers and cardstock
Do crafts Forever Friends Kraft Notes 12" x 12" paper pad, Anna-Marie designs dottie card in chocolate and café latte, Kanban floral swirl printed card, Create and crafted pearlescent cardstock in teal and Create and Craft Topsy Turvy cardstock in teal/blue, core'dinations card in brown.
Embellishments
Kanban sheet of die cut flowers and birdcages, Material brads, assorted ribbon pieces in beiges, turquoises and browns, Cosmic Shimmer coloured pearlescent glues in Teal Sky and Chocolate Brown and finally Anna-Marie pearl sprays in blue.
other items used were Tim Holtz distress ink in Brushed Courdray, Collall all purpose glue and Collall glue gel
First I took an A4 sheet of chocolate dottie card and trimmed off 1/2" from one long side and one short side so that it would mat nicely onto the base without interfering with the ringbinding.
I created various layers from the Kraft notes papers and café latte dottie card 2 of which I die cut using the Branching out and Labels 20 dies. I attached these to the notebook using all purpose glue.
Before I matted the labels 20 piece I inked it with the distress ink pad.
I embellished my project with butterflies, flowers, birds and bird cages the majority of which were from a kanban kit. Extra floral, leaf, corner and bird embellishments were created using the various spellbinders dies. The leaves and corners were cut from the teal and pearlescent teal card and the bird was cut from the core'dinations brown card. These embellishments were attached to the notebook using 3d glue gel in order to give a secure bond but also lots of dimension!!
The project was finished with pearl stems and cosmic shimmer glues and lots and lots of pieces of ribbon tied around each ring of the binding.
The finished notebook in all its glory- definitely going to be one of those sit and stroke items!!
Close up of Fleur de lis corner, sprigs and foliage as well as little tweets bird. This corner also features layered Kanban flowers and butterfly trails created Coloured PVA from Cosmic Shimmer.
These pictures show close ups of the gorgeous Kanban butterflies and bird cage embellishments
The butterflies antenna have been created from the Anna-Marie blue pearl stems
The lovely fabric brads have been used to create the centres of the Kanban flowers
The gorgeous array of ribbon pieces that have been put to good use along the spine of this ring binding that otherwise would have been too small for anything else and been thrown away!!


 Using cosmic shimmer I glued to the bottom third of the canvas. Once dry I distressed using Adirondack Latte and Tim Holtz old paper to give the sand further colour.